Decadent Pheasant

Native to Asia, pheasants were introduced as wild game in Great Britain during the 10th century by the Normans and the Romano-British.  Although hunted to near extinction in the early 17th century, pheasant was rediscovered as choice game 150 years later.  Since then, pheasants have been widely bred and managed by professional gamekeepers. Although pheasant was and still is very popular among nobles, it was illegal for commoners to enjoy the decadent and savory meat. In the case of pheasant, feathers were prized and reserved for nobility; anyone caught wearing pheasant feathers, were labeled as a poacher and were often put to death.

It is no secret that I love cooking and eating game.  I been very lucky obtaining pheasant at our local higher-end and Asian grocery stores; they are already cleaned and prepared for cooking, which makes my job as a cook easier. Preparing a pheasant for cooking is usually no easy task. It usually requires removing the skin and feathers, preparing the insides and removing the smaller joints.  There are a number of resources available that I like to use including http://www.doityourself.com/stry/cleaning-wild-pheasant#b.


How to Prepare Wild Fowl for Cooking
Below is how my family has cleaned wild fowl for generations.  I am aware that many of my readers are may be faint of heart and could not deal with explicit directions on preparing wild bird game for cooking.  If you are one of my readers, I would recommend skipping the next paragraph and moving onto the recipe.

Cleaning pheasant is a lot easier than most wild game.  The first step of cleaning pheasant is removing the feathers.  This can be challenging at times as you would pull the feathers in the opposite direction that they lay.  An additional step is to use a torch or lighter to remove any extra smaller feathers.  Many people choose to save the feathers for their renaissance costuming needs as they make nice additions to hats and brooches, if your societal station allows it. Next, remove the head, wings and feet with a sharp knife or kitchen scissors.  To remove the entrails, carefully cut the abdomen and then carefully scoop out the organs out with a finger; taking special care to ensure the trachea and other neck structures are removed as well.  Once the bird’s chest and abdomen cavity are cleaned of the larger debris, rinse the inside and outside of the bird with cold water and it is not ready for the oven.

Ingredients:

Pheasant wrapped in bacon before cooking

1 pheasant, cleaned and skinned

1 lb. of sliced bacon

3 sprigs of fresh thyme

½ tsp of black pepper, fresh ground

½ tsp sea salt

2 tbsp olive oil

1 clove of garlic, minced

Preheat the oven to 350 degrees.  In a shallow dish coat the inside of the pan with olive oil; the pan can be metal or ceramic.  In a small bowl, add the salt, pepper and minced garlic.  Remove the fresh thyme leaves from the sprigs and add the leaves to the small bowl with the other ingredients; dispose of the thyme branches.  Take a knife and split the pheasant in half the length way from neck to rear.  With your hands, take the spice mixture and apply it liberally to the outside and inside the cavity of the pheasant.

Lay strips of bacon evenly, surrounding the pheasant from top to bottom.  The bacon will help keep the pheasant from drying out and some additional flavor to the meat.  Lay the bacon-wrapped pheasant in the oiled pan and cover the pheasant before placing in the oven.

Final dish: Pheasant with Bacon and Green Beans

The pheasant should bake covered for 20 – 25 minutes.  Pull the pheasant out, uncover and put it back in the oven in the opposite direction it was cooking originally for another 10-15 minutes until the bacon is crisp on the outside.  The meat should be done, but one can double check by using a meat thermometer and the internal temperature should be 160-165 degrees.  The meat should rest for 5 minutes before serving.  I usually serve the pheasant with the bacon as they complement each other.

In the photo, I prepared fresh green beans with the pheasant.  In the past, I have served pheasant with oven-roasted turnips, parsnips, and carrots to add some additional color to the plate.  I usually serve pheasant with a robust red wine.

Cooking with Cheese

Cheese has been traced to the Sumerians, Egyptians, and has been found throughout the world. Each culture has had its own version of cheese; in central Asia, cheese was made from yak milk. North Africans used milk from wild pigs and Europeans used milk from reindeer, water buffalo and mares. But it was the Romans who perfected the art and began to age their cheeses, preparing to send their product out to the marketplace.

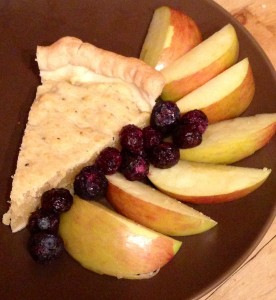
Cheese pie served with fresh apple slices and blueberries

Early cheeses were made from adding milk into a container made from an animal’s stomach. The stomach contains a natural enzyme called rennin and would cause the milk to curdle. When churned, the milk would be separated from curds and whey, which could be strained to create two milk by-products. The curds would be gathered and cooked to create cheese. Softer cheeses were cooked at a lower temperature and higher temperatures results in the harder varieties. Cheese makers would drain off any additional liquid whey, and then would salt and cut the hardened curd. The processed curd would be pressed into molds and would be further aged/cured in nearby caves or holes in the ground.

During the Renaissance, cheese was served as a dessert and was reserved for the middle or wealthier classes. The merchant/middle class would enjoy softer goat cheeses with grapes or figs and the wealthy would enjoy a cheese course, which was served before or during dessert.

One of the more popular desserts was the cheese pie. This dessert is very different than the desserts for modern palates; it is not sweet and, depending on the cheese, can be pungent. To offset its strong flavor the cheese would be served with fresh grapes or figs. Traditionally, pastry crusts were very hard and were used as a container for many types of dishes. The pie crust below is a modern execution of that recipe and creates a flakier and tastier crust.

Pie Crust Recipe:
2 cups of all-purpose flour
½ tsp of finely ground sea salt
½ cup of butter or lard, softened
¼ cup of cold water

Mix the flour and salt until well combined. Cut the butter or lard up into teaspoon chips and add it to the flour mixture.

Using a large fork, begin crushing the butter or lard into the flour and salt mixture. Begin adding the water at 2 tablespoons increments until a soft, non-sticky dough forms into a ball.

Refrigerate the dough for 1 hour or more before rolling out. This will allow the fat to combine with the flour and will create a flakier crust. While the crust “cures” in the refrigerator, you can begin making the filling.

Cheese Pie Filling Recipe:
1 cup of all-purpose flour
¼ tsp of salt
Pinch of black pepper
¼ tsp powdered mustard
½ cup of grated Gouda cheese (other “white” cheeses may be used as well).
2 egg yolks
¼ cup of lard or butter
Water

Mix together the flour, salt, pepper, mustard. Add the butter or lard and begin to blend together with a fork. Add the cheese and egg yolks. If the filling seems too dry, add the water 2 tablespoons at a time until a thick cream is developed. Cover and let cool for 30 minutes.

Preheat the oven to 375° F.

Roll out the pie crust into a 10” circle. You can use a plate to measure the circle. Place the pie crust into an 8” pie tin; there should be enough of the crust to go over the pie tin. Pierce the crust 6 times in the bottom of the pan; this will help the crust to cook evenly.

Move the cheese mixture from the covered bowl onto the crust and spread evenly. Roll the edges of the pie crust inward or crimp or pinch the crust; this will add a decorative element to the pie.

Set the pie into the oven to bake for approximately 12-18 minutes, depending on altitude. The crust edges should be golden brown. Let cool for 7-10 minutes before cutting. Serve with fresh figs, berries or apples and honey.

Making Bread the Renaissance Way

During the Renaissance, bakeries were considered the epicenter of many larger towns.  The townsfolk would buy their breads on a daily basis and they could catch up on the news and gossip of the town at the bakery.  Unlike our modern bakeries with electrical or gas ovens, the bakers’ ovens were usually heated with wood or peat and were often built into the bakery’s architecture.

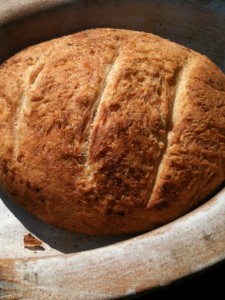
Rustic peasant bread before slicing

This past year, I became very familiar with the art of wood-fired baking. I had recently acquired a wood-burning oven to practice my baking skills.  The oven provided some fairly accurate experiences of working in a bakery during the Renaissance.  Each morning, I would heat the oven with birch and oak wood and would gradually warm up the oven.  Once the oven was hot enough, I had the option of pushing back the hot coals to keep the heat longer or rake them out to cool the oven faster and then bake directly on the oven’s stone hearth.

There were many challenges in baking with traditional methods.  From our modern perspective, the largest challenge Renaissance era bakers faced were the lack of prepackaged yeast.  Bakers would have to create yeast naturally or find another baker to purchase or acquire live yeast.  The live yeast was also known as wild yeast and grows naturally nearly everywhere, but it takes about a week to develop.

With patience wild yeast can be grown at home, but it takes a time.  Below is one of my traditional methods of growing wild yeast.

Recipe for Wild Yeast
Combine 1/2 cup unflavored yogurt and two tablespoons of flour in a clean bowl. Cover with a cloth and let it rest for 24 hours.

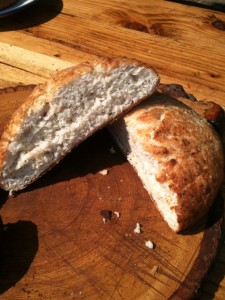
Peasant bread after slicing

Remove any liquid that develops over the yeast.  Add two tablespoons flour and two tablespoons of water and stir every morning for a week.   Make sure that you are removing any extra liquid before adding more flour and water to the mixture.

If too much starter grows, throw away half and replace it with an equal volume of the flour and water mixture.  If bubbles develop, begin feeding the yeast every six hours with the flour and water mixture. Continue to pour off any water.   Feed the yeast with the flour and water mixture about an hour before you plan to use in a recipe.

A Traditional Bread Recipe
Now the yeast that is grown would be traded or sold to other bakers.  It can be messy and time consuming and the ease and the availability of dry yeast allow for tasty, and yet fairly easy bread recipes.  The recipe below is for rustic peasant bread and has been tested and written for modern ovens and equipment

Rustic Peasant Bread
1 package dry yeast
2 cups warm (not hot) water
1 tablespoon sugar
(honey was used during the Renaissance, but it doesn’t rise as much as using sugar)
2 teaspoons salt
4 cups flour
Cornmeal
Melted butter

Place yeast, water, and sugar in a bowl and stir until dissolved.  The sugar will help feed the yeast and help the process along.

Blend the flour and salt together.  Add the liquid yeast to the dry ingredients and stir until well blended. Do not knead.

Cover with a warm damp cloth and let it rise until double its original size (approximately 1 hour).

Remove the dough from the bowl, divide it, and place in 2 rounds on a greased cookie sheet sprinkled with cornmeal; the cornmeal will help stop the bread from sticking to the pan. Let the dough rise an additional hour.

Brush top on dough with melted butter and bake at 425 degrees for 10 minutes.  Reduce oven temperature to 375 degrees and cook for an additional 15 minutes.

Serve warm.

Birth of Risotto

Rice was introduced to the Italians and Spaniards by the Arabs during the Middle Ages. The weather along the Mediterranean Sea was ideal for growing the shorter grained rice, like the Arborio, and the merchants in Genoa, Venice and surrounding towns were able to profit from the rice growing industry that catered to the wealthy.

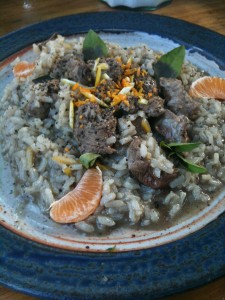
Citrus Lamb with Risotto

As interest in trade with the Mediterranean increased, others discovered the Italian delicacy and the demand increased for the short-grained rice. The Italian merchants’ profits grew as only the wealthy could afford the rice and other merchants took interest in this profitable product and began providing it as well. The increased availability flooded the market and lowered the price of the rice, making it more affordable.

Southern Italians had used the rice as a staple and slow-cooking (cooking over a low heat source for a long period of time) was predominantly used to prepare the daily meals. When slow-cooking the meals with the short-grained rice, it would combine the rice’s naturally occurring starch with rich stock or broth and create a creamy sauce; this practice would create risotto.

The recipe below utilizes the same principles of items found in southern Italy – lamb, citrus (lemons and oranges), olive oil, Arborio rice, and lemon basil. Although lamb is not commonly combined with citrus, but in this case it complements the risotto. Thus, creating a rich meal that tastes like it would be made for a special occasion, but is relatively easy to make.

Citrus Lamb with Risotto
Ingredients
2 lbs of lamb cubed
1 whole lemon (juice and zest)
1 tsp of orange zest
2 cups of lamb stock (veal or beef stock can be used instead)
1 cup Arborio rice (uncooked)
1 tsp of lemon basil, minced
1 tbsp olive oil
Sea salt (to taste)
Black pepper (to taste)

Remove the zest (skin) from the entire lemon and cut the lemon in half. You may use a zester (like a smaller cheese grater) or hand-shave the zest with a sharp knife; make sure you do not include the white pith (the area between the zest and the fruit). Once shaved, mince the zest and hold aside; the zest will provide most of the citrus flavor in this dish. You may do the same thing with an orange to get fresh orange zest.

Use a fork to pierce the lemon and squeeze the juice into a cup. The piercing will help remove the juice more efficiently. Make sure there are no seeds in the juice and set aside for later. Dispose of the lemon once the zest and juice have been harvested.

Add medium heat to a large skillet or pot and add the olive oil; add the lamb and a teaspoon of the lemon zest to brown slightly. Remove from the lamb from the pot and put aside, but leave the remaining fat and oil in the pan.

Place the pot back onto the medium heat and add the rice; brown the rice in the lamb fat and olive oil. Once browned, begin slowly adding the stock on medium heat while constantly stirring. Add the juice from the lemon to the rice. Add a lid to the sauce pan and continue to cook until both the rice has puffed up and a most of the stock has evaporated.

Add the lamb and the remaining lemon and a half teaspoon of the orange zest and lemon basil. The remaining orange zest and lemon basil will be used as a garnish prior to serving. Continue to cook the lamb and add salt and pepper to taste.

Serve family style on a single plate or bowl and sprinkle the remaining orange zest and lemon basil on top of the dish as a garnish. For the photo, small orange slices were added for additional color.

Peasant Harvest Feast

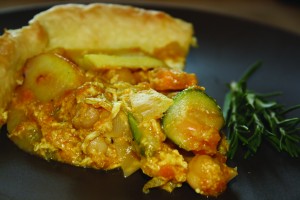
Vegetable Pie, photograph taken by Alice the Cook on June 24, 2012

When the crops were ready for harvesting, communities would come together as a community to help reap the crops and celebrate their bounty. Vegetables were plentiful and they readily became part of the feast. Similar to the American Thanksgiving, these feasts celebrated the family, the community, and the harvest.

Feasts were different for economic classes: noble’s feasts included venison, pheasant, and other wild game while the  other classes enjoyed wild hare, fresh fish, and forged items like wild mushrooms, berries, and other scavenged delicacies.  Recipes were created that used the harvested items and often included items that weren’t normally available, but were saved for special occasions.

The recipe below is one such recipe – vegetable pie.  The filling used items that were readily found during harvest time.  This particular dish may be served as a main course, an alternative to a meat option, or served as a side dish.  The provided pastry crust recipe is a standard and has been used by my family for generations. Although people will often create shortcuts to any recipe and store bought pie crust and heat-and-serve soups can be used.  However, the recipe I am providing has no shortcuts.

Pie Crust
2 1/2 cups all-purpose flour, plus extra for rolling
1 cup (2 sticks or 8 ounces) unsalted butter, semi soft and cut into cubes
1 tsp salt
6 to 8 tbsp ice water

Combine flour, salt, and sugar together and mix thoroughly. Add butter and crush into the flour mixture with a fork until it resembles coarse meal, with pea size pieces of butter. Add ice water a tablespoon at a time, blending until mixture just begins to clump together. Don’t add too much water as it will make the crust tough.

Vegetable Pie that is ready to eat.

Place the dough on a clean surface such as a cutting board.  Press down on the dough a few times to help flatten the dough between the layers of flour which will help make the crust flaky. Shape the dough mixture into two parts.  Sprinkle a little flour around the mounds of dough and wrap each disk in wax paper and refrigerate at least 1 hour, and up to 2 days to cure the dough.

Remove the crust from the refrigerator. Let sit at room temperature for 5-10 minutes in order to soften enough to roll out the dough with a rolling pin on a lightly floured surface to a 12-inch circle and about 1/8 of an inch thick. Carefully place each dough segment into two 9-inch pie plates (one in each). Gently press the pie dough down so that it lines the bottom and sides of the pie plate.  Pre-bake the dough at 375 degree until it is half baked.

Vegetable Pie
2 cups vegetable stock
3 large carrots, julienned
3 cloves of garlic, minced
1 medium sweet potato, peeled and julienned
1 leek, diced
4 medium red potatoes, thinly cut and then julienned
2 eggs, scrambled (for vegans use 2 tbsp of corn starch or powdered arrowroot instead)
1 can of garbanzo beans/chickpeas, drained and rinsed
4 tbsp olive oil
1/2 tsp cinnamon
1/8 tsp fresh ginger, minced (optional)
1/8 tsp powdered clove

Sauté the vegetables (carrots, garlic, leeks, sweet potatoes, and potatoes) in olive oil. When leeks are transparent, add chickpeas and 2 cups of soup or broth and continue to simmer. When carrots and potatoes are tender, slowly add eggs to thicken pie filling. If eggs are not desired, gradually add corn starch or arrowroot to thicken.

Add pie mixture to crust and continue to bake for 10 minutes until pie crust is golden brown.  Let cool for 5 minutes before serving.