Making Bread the Renaissance Way

During the Renaissance, bakeries were considered the epicenter of many larger towns.  The townsfolk would buy their breads on a daily basis and they could catch up on the news and gossip of the town at the bakery.  Unlike our modern bakeries with electrical or gas ovens, the bakers’ ovens were usually heated with wood or peat and were often built into the bakery’s architecture.
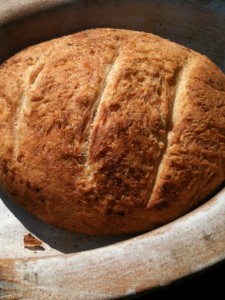
Rustic peasant bread before slicing

This past year, I became very familiar with the art of wood-fired baking. I had recently acquired a wood-burning oven to practice my baking skills.  The oven provided some fairly accurate experiences of working in a bakery during the Renaissance.  Each morning, I would heat the oven with birch and oak wood and would gradually warm up the oven.  Once the oven was hot enough, I had the option of pushing back the hot coals to keep the heat longer or rake them out to cool the oven faster and then bake directly on the oven’s stone hearth.

There were many challenges in baking with traditional methods.  From our modern perspective, the largest challenge Renaissance era bakers faced were the lack of prepackaged yeast.  Bakers would have to create yeast naturally or find another baker to purchase or acquire live yeast.  The live yeast was also known as wild yeast and grows naturally nearly everywhere, but it takes about a week to develop.

With patience wild yeast can be grown at home, but it takes a time.  Below is one of my traditional methods of growing wild yeast.

Recipe for Wild Yeast
Combine 1/2 cup unflavored yogurt and two tablespoons of flour in a clean bowl. Cover with a cloth and let it rest for 24 hours.

Peasant bread after slicing

Remove any liquid that develops over the yeast.  Add two tablespoons flour and two tablespoons of water and stir every morning for a week.   Make sure that you are removing any extra liquid before adding more flour and water to the mixture.

If too much starter grows, throw away half and replace it with an equal volume of the flour and water mixture.  If bubbles develop, begin feeding the yeast every six hours with the flour and water mixture. Continue to pour off any water.   Feed the yeast with the flour and water mixture about an hour before you plan to use in a recipe.

A Traditional Bread Recipe
Now the yeast that is grown would be traded or sold to other bakers.  It can be messy and time consuming and the ease and the availability of dry yeast allow for tasty, and yet fairly easy bread recipes.  The recipe below is for rustic peasant bread and has been tested and written for modern ovens and equipment

Rustic Peasant Bread
1 package dry yeast
2 cups warm (not hot) water
1 tablespoon sugar
(honey was used during the Renaissance, but it doesn’t rise as much as using sugar)
2 teaspoons salt
4 cups flour
Cornmeal
Melted butter

Place yeast, water, and sugar in a bowl and stir until dissolved.  The sugar will help feed the yeast and help the process along.

Blend the flour and salt together.  Add the liquid yeast to the dry ingredients and stir until well blended. Do not knead.

Cover with a warm damp cloth and let it rise until double its original size (approximately 1 hour).

Remove the dough from the bowl, divide it, and place in 2 rounds on a greased cookie sheet sprinkled with cornmeal; the cornmeal will help stop the bread from sticking to the pan. Let the dough rise an additional hour.

Brush top on dough with melted butter and bake at 425 degrees for 10 minutes.  Reduce oven temperature to 375 degrees and cook for an additional 15 minutes.

Serve warm.

Garam Masala, Curry and Curry Chickpea Stew

This is the recipe that was featured on my Facebook fan page.

Garam Masala
Ingredients

Cinnamon sticks, broken into smaller pieces
Caradamom pods (green, black, or brown)
Ginger, dried and cracked
Coriander seeds
Techillacherry black peppercorns
Cumin seeds
Dried chili peppers (do not use powder)

Heat up a cast iron skillet so that it is quite hot and add the spices in order to dry roast them together. I recommend adding each spice a teaspoon at a time.  It will make more than you need, but you can save small quantities to use later.  Don’t over make the spice, as its potency will wear off over time.Curry Chickpea Stew

Once the chili peppers are brown, remove the spice mixture off of the heat and add them to the mortar and pestle to begin breaking the spices down for easier grinding.  Once broken down, you can continue grinding them in the mortar and pestle, or you may use a spice or coffee grinder to combine the spices into a finer blend.

Once ground up, the garam masala may be moved into a storage jar for future use.  Our side of the recipe below, garam masala may be added to fish, lamb, chicken, or beef, and may be used to accent saffron rice, orzo, or risotto.

Curry Spice Blend Recipe

Mustard seeds
Turmeric powder
Garam masala (see the above recipe or use store bought)
Coriander
Garlic powder (course),
Ginger, dried and cracked (preferred)
Cumin seeds

Heat up a cast iron skillet so that it is quite hot and add the spices in a particular order (THIS IS VERY IMPORTANT). I recommend adding each spice a teaspoon at a time.  It will make more than you need, but you can save small quantities to use later.  Don’t over make the spice, as its potency will wear off over time.  First, add the mustard seeds.  When they begin to pop, add the cumin seeds, coriander seeds, ginger, and garlic.  It’s important to use dried garlic and ginger as it will minimize the scalding of the spices.

Once toasted, remove from the heat and grind together.  Once ground add a teaspoon of the garam masala and 2 teaspoons of the tumeric and stir together with a wooden spoon.  Your curry spice blend is complete.  

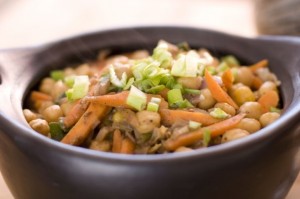
Curry Chickpea Stew
(follow the recipe as is)

Ingredients:
1 tsp sea salt
1 can of chickpeas, drained and rinsed
2 medium red potatoes, sliced thinly
1 medium onion, diced
3 green onions, chopped
1 tsp mustard seeds
1 tsp turmeric
1 tsp garam masala
2 tsp coriander, ground
2 tsp garlic, minced
2 tsp ginger, dried and cracked (preferred) ground is also acceptable
1 tsp cumin seeds
3 medium carrots, julienne
2 tablespoons of olive oil
1 cup of water
Optional items: potatoes, zucchini, eggplant, sweet potatoes, yams, fresh chili peppers, etc.

In a cast iron pot, begin heating the oil. Avoid using an aluminum pan, when making this dish as the pot’s metal will detract from the flavors of this dish.

Once the oil is hot, add the mustard seeds and wait for them to begin popping.  Add the garlic, ginger, carrots, onions, any additional items (see the optional list above), potatoes, and the chickpeas and begin to stir the items lightly.  While cooking the chickpeas and vegetables, combine the whole spices in a separate bowl and blend together.

After cooking the vegetables and chickpeas for two minutes, slowly add the spice mixture to the pot and stir occasionally to mix everything together.  Cook for 4 more minutes and then increase the heat to a medium-high level.  Add the cup of water and continue to cook until the carrots and potatoes are soft.  Remove the pot from the heat and cover the stew. Let the vegetables and chickpeas absorb the flavors of the curry for 10 minutes,  Garnish with the green onions before serving.

Serves 2 main dishes, or four side dishes


Birth of Risotto

Rice was introduced to the Italians and Spaniards by the Arabs during the Middle Ages. The weather along the Mediterranean Sea was ideal for growing the shorter grained rice, like the Arborio, and the merchants in Genoa, Venice and surrounding towns were able to profit from the rice growing industry that catered to the wealthy.

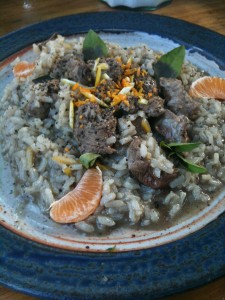
Citrus Lamb with Risotto

As interest in trade with the Mediterranean increased, others discovered the Italian delicacy and the demand increased for the short-grained rice. The Italian merchants’ profits grew as only the wealthy could afford the rice and other merchants took interest in this profitable product and began providing it as well. The increased availability flooded the market and lowered the price of the rice, making it more affordable.

Southern Italians had used the rice as a staple and slow-cooking (cooking over a low heat source for a long period of time) was predominantly used to prepare the daily meals. When slow-cooking the meals with the short-grained rice, it would combine the rice’s naturally occurring starch with rich stock or broth and create a creamy sauce; this practice would create risotto.

The recipe below utilizes the same principles of items found in southern Italy – lamb, citrus (lemons and oranges), olive oil, Arborio rice, and lemon basil. Although lamb is not commonly combined with citrus, but in this case it complements the risotto. Thus, creating a rich meal that tastes like it would be made for a special occasion, but is relatively easy to make.

Citrus Lamb with Risotto
Ingredients
2 lbs of lamb cubed
1 whole lemon (juice and zest)
1 tsp of orange zest
2 cups of lamb stock (veal or beef stock can be used instead)
1 cup Arborio rice (uncooked)
1 tsp of lemon basil, minced
1 tbsp olive oil
Sea salt (to taste)
Black pepper (to taste)

Remove the zest (skin) from the entire lemon and cut the lemon in half. You may use a zester (like a smaller cheese grater) or hand-shave the zest with a sharp knife; make sure you do not include the white pith (the area between the zest and the fruit). Once shaved, mince the zest and hold aside; the zest will provide most of the citrus flavor in this dish. You may do the same thing with an orange to get fresh orange zest.

Use a fork to pierce the lemon and squeeze the juice into a cup. The piercing will help remove the juice more efficiently. Make sure there are no seeds in the juice and set aside for later. Dispose of the lemon once the zest and juice have been harvested.

Add medium heat to a large skillet or pot and add the olive oil; add the lamb and a teaspoon of the lemon zest to brown slightly. Remove from the lamb from the pot and put aside, but leave the remaining fat and oil in the pan.

Place the pot back onto the medium heat and add the rice; brown the rice in the lamb fat and olive oil. Once browned, begin slowly adding the stock on medium heat while constantly stirring. Add the juice from the lemon to the rice. Add a lid to the sauce pan and continue to cook until both the rice has puffed up and a most of the stock has evaporated.

Add the lamb and the remaining lemon and a half teaspoon of the orange zest and lemon basil. The remaining orange zest and lemon basil will be used as a garnish prior to serving. Continue to cook the lamb and add salt and pepper to taste.

Serve family style on a single plate or bowl and sprinkle the remaining orange zest and lemon basil on top of the dish as a garnish. For the photo, small orange slices were added for additional color.

Coming Soon – Benefits of Spices

On my facebook page, fans have asked a lot of questions on spices and herbs. I’m going to begin adding some information on the historical uses of spices and herbs and share a recipe focused on that spice/herb. My goal is to do a weekly story/article. This is something I’ve wanted to do for a while and just didn’t have the time for it. 

Stay tuned readers, fresh content will be on its way!


Spice Blends from our Demonstrations

Each day, we demonstrate how to make various spice blends over an open fire.  An earlier entry – http://alicethecook.com/?p=801 talks about how we do it, but doesn’t necessarily cover the recipes.  Due to popular demand, below are the spices we demonstrate (and sell) at the Minnesota Renaissance Festival.

Spices change based on the tastes of individuals and family units. Some prefer savory tastes and others prefer a spicier blend.  You can adjust accordingly. 

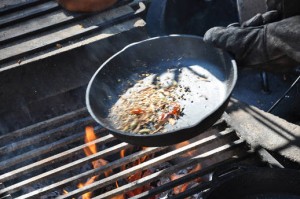
Toasting the garam masala spices

Please remember that you need to use a hot, dry cast iron plate for toasting these spices. 

  1. Gather your spices
  2. Toast the spices
  3. Grind up the spice.  You can use an electronic grinder, but make sure you do not use a coffee grinder.  Keep them separate so that you can enjoy both. 
  4. Use the spices as needed

As the spices age after grinding, they diminish potency significantly over time.  Most of the ingredients can be purchased through a co-op or a spice specialty store, such as Penzey’s Spices or Spice House; I’ve also had a lot of luck locating hard-to-find spices through Amazon.com.

If you to make more spices make sure you freeze your spices in an airtight bag to minimize the loss of flavor.

  • Garam Masala: cumin, coriander, black pepper, cardamom, chilies, clove, cinnamon, and nutmeg
    In the case of garam masala, you would toast the spices together and grind them.
  • Curry:  sea salt, mustard seeds, turmeric, garam masala, coriander, garlic, ginger, and cumin
    In the case of the curry, you would begin toasting the mustard seeds until they begin to pop.  You would then add the salt, coriander, garlic, ginger, and cumin.  As a note, I would strongly recommend using dried spices instead of fresh ginger and garlic as they will scorch on a hot pan. Once toasted, I would begin grinding and then add the garam masala and the turmeric after. 
  • Ras El Hanout: cinnamon, cloves, corriader, cumin seeds, allspice, nutmeg, cardamom (use sparingly), ginger, fennugreek, fennel seeds, mustard seeds, dried Damascus rose petals, and optional chilis
    Like the garam masala, these would be toasted and ground together.  The rose petals will float to the top and be the last ingredient to grind.

I hope you enjoy these as much as we do!