Bangers and Champ – Renaissance Magazine Article

On March 17, many Americans and their European counterparts will be celebrating Saint Patrick’s Day.  On this particular day, I tend to visit a pub or two and partake in the food and as well as the lively company.

Over the years, several Irish dishes that have grown in popularity include Guinness lamb stew with soda bread, seafood boxtys (seafood stew served on a thin potato pancake), colcannan or champ (mashed cabbage or green onions and potatoes), coddle (a simple, slow-cooked stew made from pork, sausages, potatoes and onions), Irish boiled dinner (corned beef and cabbage), and, my favorite, bangers and mash.

Bangers and mash are simply a course ground pork or beef sausage served with mashed potatoes.  The sausage earned its moniker of “banger” from the noise the sausage casings make while popping or making a bang as they cooked.

Making bangers and mash can be a simple or complex task.  Course ground sausages can be bought at a store and serve with regular mashed potatoes, but, as a traditionalist, I thought I would provide a recipe to make bangers and champ at home.
Banger Ingredients:

1/2 pound ground lean pork
1/2 pound ground lean veal
6 ounces ground pork fat
3 slices white bread with crust, crumbled or finely chopped
1 tsp salt
1/4 tsp black pepper
1/4 tsp cayenne pepper
1/8 tsp mixed grated nutmeg
1/8 tsp mace
1/4 tsp minced fresh thyme or 1/8 tsp dried thyme
1/4 tsp minced fresh marjoram or 1/8 tsp dried marjoram
2 tsp minced fresh sage or 1 tsp dried sage
1 tsp loosely packed, finely grated lemon zest (see Note)
1 large egg
Prepared hog or gelatin casings

Preparation:

Combine ground pork, ground veal, pork fat, and bread.

Whisk together salt, pepper, cayenne pepper, nutmeg, mace, thyme, marjoram, sage, lemon zest, and egg.

Knead into pork and veal mixture

Stuff sausage mixture into prepared the casings, compacting the sausage firmly. Prick any air pockets with a pin.

Bangers may be poached, braised or fried. Raw sausages will keep up to three days in the refrigerator and 3 months in a freezer.  Cooked sausages may be refrigerated up to 1 week or frozen up to 3 months.  While they are cooking, the mashed potatoes, champ, or colcannon can be made.  To make colcannon, follow the same recipe below, but substitute green cabbage for the green onion.

Champ Ingredients:

4 pounds potatoes
1/2 pint whole milk or cream
1 cup chopped green onions
1/2 cup butter
Salt and black pepper to taste

Preparation:

Thoroughly wash the potato skins and cut the potatoes into medium sized cubes.  If you do not like the potato skins in your mash, peel your potatoes before cooking them in boiling water until tender.

Simmer milk and spring onions together for five minutes. Once tender, drain potatoes, add the hot milk with the spring onions, salt and pepper, and half of the butter.

The banger recipe will yield 2 pounds raw sausage

The champ recipe will yield 8 servings

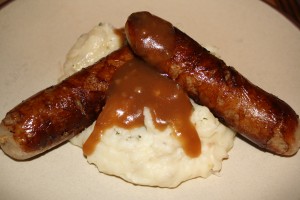
To serve in the traditional manner, the champ or mashed potatoes would be placed on the plate first and the sausages would be served on top.  Depending on your tastes, I have seen this dish served plain, with onion or sausage gravy, and/or with horseradish.   In the photograph, I’ve prepared gravy from the rendered fat from the bangers.

Bainigí sult as an bia! (“Enjoy the food” in Gaelic)

Moussaka

Moussaka is a very rich casserole that originated in Greece. The recipe takes some time to put together, but like good lasagna, it’s worth it.

The best way to make moussaka is in steps. Start with the meat sauce, and while that is simmering, prep the potatoes and eggplant. Make the béchamel last because it is not a sauce that holds up very well.

Moussaka Recipe

NOTE: All sorts of cheese can be used here. To be authentic, I recommend using kefalotyri. In this recipe, I used mizithra, which is becoming increasingly available in supermarkets. No need to search the globe for these cheeses, however, as a pecorino or any hard grating cheese will work fine.

INGREDIENTS

Meat sauce
2 pounds ground lamb or beef
2 Tbsp olive oil
1 chopped onion
4 chopped garlic cloves
1 teaspoon ground allspice
1 teaspoon ground cinnamon
1 teaspoon black pepper
1 Tbsp dried oregano
2 Tbsp tomato paste
1/2 cup red wine
Zest of a lemon
2 Tbsp or more of lemon juice
Sea salt to taste

Bechamel sauce
1 stick unsalted butter
1/2 cup flour
1 teaspoon salt
4 cups whole milk
4 egg yolks
1/2 teaspoon ground nutmeg

The moussaka
3 large globe eggplants
1/2 cup salt
8 cups water
2-3 Yukon gold or other yellow potatoes
1 cup grated mizithra cheese (or pecorino or Parmesan)
Olive oil

METHOD

Prepare the meat sauce

1.   Heat the olive oil in a large sauté pan over medium-high heat and brown the ground meat. By the way, the meat will brown best if you don’t stir it. Add the onions about halfway into the browning process. Sprinkle salt over the meat and onions.

2.  Once the meat is browned and the onions have softened, add the garlic, allspice, cinnamon, black pepper, oregano and tomato paste. Mix well and cook for 2-3 minutes.

3. Add the red wine and mix well. Bring the sauce to a simmer, reduce the heat and continue to simmer gently, uncovered for 20 minutes. Turn off the heat. Taste for salt and add more if needed. Add the lemon zest and the lemon juice. Mix well and taste. If the sauce needs more acidity, add more lemon juice.

Set the sauce aside.

Prepare the potatoes and eggplants

1.  Mix the 1/2 cup salt with the 8 cups of water in a large pot or container. This will be the brine for the eggplants.

2.  Slice the top and bottom off the eggplants. Cut thick strips of the skin off the eggplants to give them a striped appearance. A little skin on the eggplant is good for texture, but leaving it all on makes the moussaka hard to cut later, and can add bitterness, which you don’t want. (Some moussaka recipes leave the skin on and have you slice the eggplants lengthwise, which is an option if you prefer.) Slice the eggplant into 1/4 inch rounds and drop them into the brine.

3.  Let the eggplants sit in the brine 15-20 minutes, then remove them to a series of paper towels to dry. Place a paper towel down on the counter, layer some eggplant on it, then cover with another sheet of paper towel and repeat.

4.  As the eggplants are brining, peel and slice the potatoes into 1/4 inch rounds. Boil them in salted water for 5-8 minutes – you want them undercooked, but no longer crunchy. Drain and set aside.

5.  To cook the eggplant, broil or grill the rounds. You could also fry the eggplant rounds but they tend to absorb a lot of oil that way. To grill the eggplant rounds, get a grill very hot and close the lid. Paint one side of the eggplant rounds with olive oil and grill 2-3 minutes. When they are done on one side, paint the other side with oil and flip. When the eggplants are nicely grilled, set aside. To broil, line a broiling pan or roasting pan with aluminum foil. Paint with olive oil. Place the eggplant rounds on the foil and brush with olive oil. Broil for 3-4 minutes until lightly browned on one side, then flip them over and broil for a few minutes more. Set aside.

Prepare the béchamel

1.  Heat milk in a pot on medium heat until steamy (about 160 degrees). Do not let simmer.

2.  Heat the butter in a small pot over medium heat. When the butter has completely melted, slowly whisk in the flour. Let this roux simmer over medium-low heat for a few minutes. Do not let it get too dark.

3.  Little by little, pour in the steamy milk, stirring constantly. It will set up and thicken dramatically at first, but keep adding milk and stirring, the sauce will loosen. Return the heat to medium. Add about a teaspoon of salt and the nutmeg. Stir well.

4.  Put the egg yolks in a bowl and whisk to combine. Temper the eggs so they don’t scramble when you put them into the sauce. Using two hands, one with a whisk, the other with a ladle, slowly pour in a couple ladle’s worth of the hot béchamel into the eggs, whisking all the time. Slowly pour the egg mixture back into the béchamel while whisking the mixture. Keep the sauce on very low heat, do not let simmer or boil.

Finish the moussaka

1.  Preheat the oven to 350°F. Layer a casserole with the potatoes, overlapping slightly. Top the layer of potatoes with a layer of eggplant slices (use just half of the slices).

2.  Cover the eggplant slices with the meat sauce. Then layer remaining eggplant slices on top of the meat.

3.  Sprinkle half the cheese on top. Ladle the béchamel over everything in an even layer. Sprinkle the rest of the cheese on top.

4.  Bake for 30-45 minutes, or until the top is nicely browned.

Let the moussaka cool for at least 15 minutes before serving.  Yield: Serves 8.

Keeping it Local

When cooking at home or at a show, I pride myself in using local ingredients when ever possible.  Locavore, is a movement best described as people who are interested in eating food that is locally produced through family gardens, farmer’s markets, CSAs, etc. 

I’ve previously written about Farm Girl at Large, a farm owned by a friend of

Lamb from Funky Little Farm

mine, but today I wanted to let you know of another local food provider – Funky Little Farm.  I’ve had the pleasure of acquiring beef, lamb, chicken and duck eggs, fresh herbs, and a chicken or two from this farm located in Winthrop, Minnesota.  The owner, Barb Everson describes her farm, “Most of the work on this farm is done  by hand and by one person.  We own very little machinery.  We raise heritage breeds of poultry and sheep and lean heavily toward heirloom vegetables, antique fruits and herbs, and a wide variety of soay sheep, chickens, ducks, geese, turkeys, and guinea fowl.”

What makes Funky Little Farm unique from other farms is the fact that the own, Barb, used to be a cook historian (like me).  She understands that by using quality ingredients can provide a higher quality product.  I like utilizing local ingredients from Funky Little Farm and Farm Girl at Large as I know they take great care with their animals; they know how they lived, what they ate, and were treated well. 

As a meat eater/omnivore, I feel a little better knowing that the animals I eat were not penned up and enjoyed a life in the sunshine, eating sweetgrass, and doing what animals do.

Some of my readers are vegetarian, vegan, while others are not, but I ask you do you buy your groceries from a large supermarket which requires more fuel from the trucks that deliver the stock from out of state and, in some cases, out of the country, or do you buy your ingredients locally, reduce your carbon footprint, and help the economy in your community?

The products I get from these local, independent farms, have a higher quality than those I find at a local supermarket.  The vegetables and fruits are fresher and the ingredients as a whole are tastier.  If you haven’t already, check out Funky Little Farm at http://www.localharvest.org/funky-little-farm-M21667 of Farm Girl at Large – http://www.farmgirlatlarge.com and taste the difference.


Cooking Techniques of the Renaissance

Preparing food with heat or fire is an activity unique to humans and over the years it has perfected into an art form.  Many anthropologists believe that cooking over a fire developed around 250,000 years ago.   From cooking, developed agriculture, commerce, and transportation across different regions, offering cooks new ingredients and techniques.  New inventions and technologies, such as pottery to hold and boil water, expanded cooking techniques.

The most common cooking techniques included roasting with a firedog over an open fire where instead of cooking on a single spit, they use multiple spits.  Meats roasted on these firedogs included joints of larger animals or multiple smaller animals being cooked together.

Boiling meats was also popular.  Using large cauldrons, cooks would place meat in boiling water or wine and place the meat into the pot using large hooks called flesh hooks.  Meat was often parboiled before they were roasted on a firedog.  Other cooking techniques include frying, hearth baking, and oven baking.

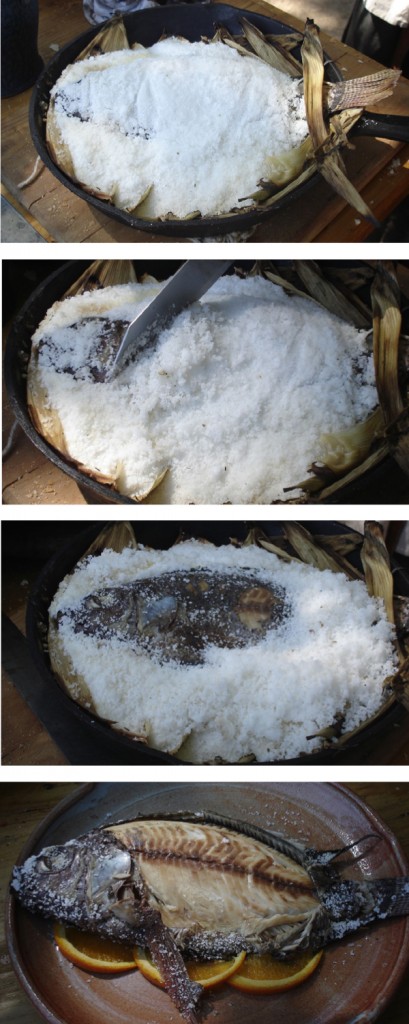
Photographic timeline of technique

One of the techniques that fell out of favor over the years is salt baking.  Baking in salt is not difficult.  This technique has become popular in many of the fine dining establishments where servers will crack and remove with flourish.  Inside the white salt dome lies perfectly cooked, moist and fragrant fish. Baking fish (or vegetables, even other meats) in a salt crust creates a sort of oven within an oven. The salt seals in moisture essentially steaming the fish inside. Because the salt absorbs the moisture, the texture of the fish ultimately is more like roasted than steamed fish.

Below is a fairly easy-to-follow recipe on how to create your own salt baked fish.  I have created this dish using a multitude of seafood including salmon, trout, eel, and other local white fish.  I hope you enjoy it as much as I have.

Ingredients:
4 cups kosher salt
1 whole red snapper, striped bass, or porgy (1-1/2 pounds), cleaned and scaled (we used tilapia in this recipe and it was delicious)
1 lemon
3 rosemary or thyme sprigs

Preparation:
Preheat oven to 450 degrees F. Line 13-inch by 9-inch baking pan with foil; spread 2 cups salt in bottom of pan.

Rinse fish inside and out with cold running water; pat dry with paper towels. From lemon, cut 3 slices. Cut remaining lemon into wedges. Place lemon slices and rosemary or thyme in cavity of fish.

Place fish on bed of salt; cover with remaining 2 cups salt. Bake until fish is just opaque throughout when knife is inserted at backbone, about 30 minutes.

During the Renaissance, cooks would place parchment, leaves, or husks in the bottom of the pot and place the fish on top of it.  It would allow the fish to bake in the salt without burning or scorching the salt or the fish.

To serve, tap salt crust to release from top of fish; discard. Slide cake server under front section of top fillet and lift off fillet; transfer to platter. Slide server under backbone and lift it away from bottom fillet; discard. Slide cake server between bottom fillet and skin and transfer fillet to platter. Serve with reserved lemon wedges.

Yield: 2 main dish servings

As you can see from the photo timeline, we pulled it from the open fire, removed the crust, and plated the dish for presentation.

Lobster Bisque

A fan specifically requested this recipe as I was bragging about eating it for my lunch today.  I like serving it from a hallowed out sourdough bun.
2 shallots chopped fine (shallots may be used)
1/2 cup butter
3/4 cup all-purpose flour
2 cups chicken broth
1/4 teaspoon white pepper
1 (11-ounce) can frozen lobster meat (or fresh lobster meat can also be used. I use more as I like a lot of lobster in my Bisque.)*
3/4 cup sherry (do not use cooking sherry)
3 cups light cream
1 tablespoon tomato paste for color

  1. Saute onions in butter until onions are clear 2 to 3 minutes. I perfer to use fresh lobster.  If you do too, saute the lobster meat with the onions for 5 minutes and then begin #2.  If you are okay using canned lobster, move to #2.
  2. Stir in flour with a whisk and stir well until smooth Add chicken broth and pepper; cook, stirring constantly, until thickened. Add frozen lobster meat and cook 20 minutes, or until done, on medium-low heat.
  3. Blend in sherry, cream and tomato paste. Absolutely delicious!