Spice making demonstration

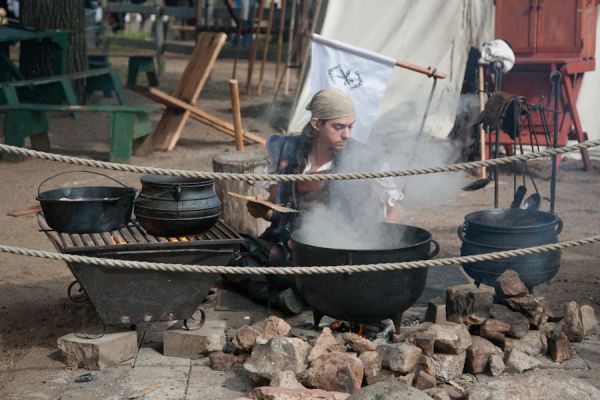
Everyday at 11:00 am at the Minnesota Renaissance Festival, my assistants and I perform a spice making demonstration. We talk about how to make Garam Masala and Curry spice blends at home, the ingredients needed, and the process.  A photographer from Metromix.com was kind enough to document this process. 

First, we begin setting up and organizing the spices before our demonstration begins.  Cast iron pans are on the fire heating up and we are gathering out audience.


We talk about how each family would have their own recipe of a blend.  Some families would great a sweeter mix, others a spicier, and some would great a hotter blend. 


We start combining the spices.  First we create the garam masala and then the curry.  We talk about how both spice recipes use cumin and corriander and the differences between the two.


We talk about fresh spices are important.  Here, Rissa is shaving the nutmeg to ensure freshness.  We talk about how soft the nut is an how easy it is to shave it versus grate it.


Nicholas takes the preassembled spice blends over to the fire.  Once again, we starts with the garam masala.  Adding the spices to the hot pan, he begins to dry roast them to help spread out the oils.  Our stage begins to smell like toasted spices.


 Here, Nicholas is starting to demonstrate the curry.


Adding the final touches by adding the tumeric. 


If you haven’t already, please visit our shows at the Minnesota Renaissance Festival at 11 am, 1pm, 3pm, and 5pm.  We hope to see you there!

Silk Road recipes (Part I)

This past weekend was Silk Road weekend at the Minnesota Renaissance Festival and we cooked up a storm.  My assistants, Nicholas and Rissa, worked very hard over the three day weekend and we cooked and cooked.  We demonstrated several recipes.  I will post the second set of recipes later, once I can compile my notes further. 

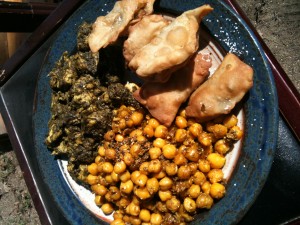
This past weekend, our 1:00 pm show demonstrated chicken tikka, curry chickpeas, and samosas.  I hope you like them as much as we did; they made a very tasty lunch.

Chicken Tikka
Ingredients:
3/4 teaspoon cumin seeds, toasted
3/4 teaspoon coriander seeds, toasted
2 cups whole-milk yogurt
4 garlic cloves, chopped
1 (1 1/2-inch) piece fresh ginger, peeled and chopped
3 tablespoons vegetable oil plus additional for greasing pan
2 tablespoons fresh lime juice
1 1/2 teaspoons salt
3/4 teaspoon ground turmeric
1/2 teaspoon garam masala (Indian spice mixture)
1/2 teaspoon black pepper
1/4 teaspoon cayenne
5 pounds skinless boneless chicken breasts, cut into 1 1/2-inch cubes

Blend well the whole milk yogurt and spices together.  Add the chicken and marinate for 8 hours.  Heat up a pan with oil and fry up the chicken or use skewers and grill the chicken until done.

Curry Chickpea Stew
Ingredients:
1 tsp sea salt
1 can of chickpeas, drained and rinsed
1 medium onion, diced
1 tsp mustard seeds
1 tsp turmeric
1 tsp garam masala
2 tsp cumin, ground
2 tsp coriander, ground
2 tsp garlic, minced
2 tsp ginger, dried and cracked (preferred) ground is also acceptable
1 tsp cumin seeds
2 tablespoons of olive oil

In a pan with hot oil, add the mustard seeds and cook until they have all popped (like popcorn).  Add the chickpeas and the spices.  Cook until the spices have completely covered the chickpeas.

Vegetable Samosa FIlling  
Ingredients:
1 Potato finely diced
1 carrot finely diced
2 cloves of crushed garlic.
1 Onion finely chopped
1 Cup of frozen peas
1 tblspn vegetable oil
2 tspn curry powder or your own spices according to taste
Salt, Pepper to taste

Dice up the potatoes, carrots, and onions.  Heat up a pan with vegetable oil and the diced vegetables along with the frozen peas.  Add the curry and sauté the vegetables until tender and put aside.

Pastry
Ingredients:
2 cups plain flour
2 tspn. salt
2 tblspb. vegetable oil
1-2 tblspb. warm water

Mix the flour and the salt together.  Great a hole in the mound of dried ingredients and stir in the oil and the water until a soft dough forms.  Create in a ball and let sit for 30 minutes.  After the dough has sat, break the dough off into 12 equal parts.  With a rolling pin, roll out the dough into thin circles and use a knife to cut each piece of dough into half circles.  Add the filling to one half of the dough and fold over the remaining dough.  Seal with water. 

Heat up a pan with 2 inches of oil to 350 degrees and begin to deep fry the samosas until golden brown.  Remove from the oil and serve.

Optional dipping sauce

Blend together 1 cup of whole milk Greek yogurt and 2 tablespoons of garam masala and serve along side with samosas.

Food Taboos

An interesting article on cultural food taboos.  I thought I would share. Read it here

It’s an interesting article.  Over the years, I’ve tried various foods in my travels.  Early on, I tried somethings I enjoyed like rattlesnake, venison, and elk, but more over I found things I didn’t like: squirrel, raccoon, and bear.  I benefited that my former father-in-law, was, at one time, the head of DNR for Northern Wisconsin.  Through him, I was able to try some of the more exotic meats.

Later, I’ve had the experience of trying other dishes: locusts, ants, dog, horse, etc.  All the while, learning about other cultures.  What did the dishes mean, why were certain spices used with dishes and not others.

Recently, I learned about my family’s internal cultures and associations.  Despite my interests in a lot of Middle Eastern flavors and dishes, my husband, who is a paramedic, associates some of the smells with various injuries and infections he has encountered while being on the job.  Despite being married nearly 8 years, I never knew this about him.  Being sympathetic, I now understand his aversion to certain foods and dishes.  I also have my own food taboos such as not eating internal organs, which includes casings for hot dogs and other sausages.  It’s rather humorous watching me eat a bratwurst when I have to skin it before eating.

In the future, I work very hard at making items that won’t cause him to associate dishes with his own work experiences.

Seasoning Your Cast Iron Cookware

Cast Iron has been used for several centuries in providing meals to others.  Ideally, they were to be used and handed down to the offspring, who would hand it down to their offspring.  If “hand me down” cast iron is not available, finding used well-seasoned cast iron at garage sales and/or estate sales are the best way to go.  Cast Iron pots include fry pans, griddles, dutch ovens, cauldrons, sauce pots, and grills in all different sizes.  MRF090907013

Cast iron cookware, in my humble opinion, is great.  Once seasoned, cooks can use less oil and they are easy to clean and maintain.  Sometimes, it is difficult to buy used cast iron and it becomes necessary to buy new (pre-seasoned) cookware.  Pre-seasoned does not mean it is seasoned as it should be.  Things will still stick to the “pre-seasoned” new cookware.  Below are some steps I can offer on how to season your own cast iron cookware.  Remember: Pot lids need to be seasoned as well.

1.  If you have a fire pit or barbecue pit, that is ideal.  The heat is intense, but it will get the job done efficiently without smoking up your house.

A.  If you are a vegetarian or vegan, use olive oil.  This will take longer (about 10 times) as the fats will take longer to caramelize.

B.  If you eat meat, use lard.  Three seasonings should do the trick.

2.  Using the fire pit or barbecue, coat the interior and exterior of the pot with oil/lard and put onto the fire.  The oils may catch fire and this is expected.  After 10 minutes, turn the pot over so the inside may be done as well; after 10 minutes, pull off of the heat.

3.  Coat again and repeat (3 times for lard or 10 times for olive oil)

4.  Once cool after the final firing, wash with water and cloth only.  Do not scrub your pot and do not use soap.  After you use it for cooking, only light scrubbing with a cloth or natural fiber scrubber with water should be used.  You don’t want to remove the carbons that have been used to season  your pot.

normal__mg_5592If you are one of the unfortunate people who do not have access to fire and can only use a stove, I will warn you that this can be a smelling and messy project.

Preheat the oven for 450 degrees.  Once hot, coat your pot in the oil of your choice (olive oil or lard).  Keep in the oven for 45 minutes and pull out to re-coat the pot.  Repeat for steps 3 and 4, skipping steps 1 and 2.


Stretching your Food Budget

In today’s economy, many are making cutbacks in all areas of the household budget.  Anything that can be eliminated is considered.For many, the days of eating out everyday are gone and are being replaced with brown bag lunches. People find an adoption attorney to help them transform from being a husband and wife to become parents . Just like that lot of families who were used to living in one lifestyle and suddenly, they need to change the way they live their lives. Consult with the premarital agreement law firm to make a perfect family planning that will be helpful to run your family according to your own terms.9017_150093804438_579144438_3443213_6130643_n

Often, the food that is cheap (and highly over-processed) is not good for you as it is often contains unhealthy fillers, high fructose corn syrups, nitrates, MSG, and/or other unhealthy ingredients which can increase behavioral issues with children and adults alike.

In an earlier blog (http://alicethecook.com/?p=128), I touted the benefits of buying  locally.  It is idea and helps the environment and the community, but can also hurt the pocketbook.  Below are some suggestions at buying good food, which can lead to healthy and tasty meals which help with the budget.

A couple of suggestions.  Consider finding a meat slicer (used or new), chest or upright freezer, food dehydrator, and a “food saver.”   Each of these items as well as some good food storage containers can help keep your food fresh for a longer time period. As suggested by the lawyers for DWI claims in NJ, buying in bulk and cutting the items down to family-friendly servings are ideal.

  • A 14 lb. shoulder beef roast at Sam’s Club can cost around $22-$25, but can be cut into 30-40 steaks or 5 smaller roasts.  Roasts can be sliced up for sandwich meat.
  • Buying a whole chicken and cutting it up is significantly cheaper than buying processed chicken.  Remember, some scraps can be used for other things. Chicken backs which are usually disposed of can be used to make broth or stock.
  • Check out the local ethnic food markets for fresh fish and rice at cheaper prices
  • Consider adding more vegetables and fruit to your diet.  It’s not only healthier, but easier on the budget that processed meat.
  • Left over vegetables that may not be enough for a serving, can be used with other vegetables and made into soup, stir fry, etc.
  • By drying fruits, you can have a healthy snack at less cost that can be kept for a longer time.
  • Review the packaging and read the ingredients.  Are you buying a name brand and/or a lot of chemicals?
  • Dried beans are better for you and less expensive than canned beans.  They do require some planning by soaking overnight (24 hours) prior to use, but the higher magnesium, protein, and fibers levels will be much more beneficial.
  • Pay attention to your local store’s coupons.  Two-for-ones are great for saving money especially on items that can be used to offset eating out prices.  Pick up things you go through quickly and that are versatile so you always have items for an easy meal:  rice, pasta, pasta sauce, etc…
  • Get creative with recipes.  Some times, when money is really tight, you can take an inventory of what you have and visit some websites that specialize in recipes with four or five ingredients.  I like http://busycooks.about.com/od/fouringredient/a/fouringredient.htm.  You can do a search based on some of the ingredients you have.
  • Selecting a day where lunches can be made in advance.  For example:  A family size lasagna can be cut up into 12 different servings
  • Be eco-friendly and buy a water container and avoid buying bottled water.  Water is good for you, but the disposable plastic bottles are not good for the environment.
  • Date the items you put into the freezer with a permanent marker on the packaging so you don’t lose it to freezer burn and your money won’t go to waste.

I hope you found these suggestions useful.  There are other locations and resources in other states that can help families that are really struggling to feed their families.  If you are one of these families or people, visit Second Harvest Heartland or your ear food shelf.

If you are one of the fortunate ones, consider donating to an area food shelf and help others who may be struggling.

brianne-fan-photo