Who is Alice the Cook?

Alice the Cook
Alice the Cook

Alice the Cook has performed at various renaissance festivals and historical re-enactment shows as a cook who recreates recipes that have been used since the 1400s. She specializes in British, Irish, Scottish and Welsh cuisines, but has been known to explore French, Spanish, Italian, Middle Eastern, and Indian cuisines as well. She has written articles for Renaissance Magazine and gives lectures on the use of herbs from the Middles Ages to modern times and how herbs were used to help the ailing.

She continues to test recipes in her kitchen. By using cast iron pots and wooden utensils, Alice the Cook prepares recipes in a traditional manner and even utilizes an outdoor fire pit.


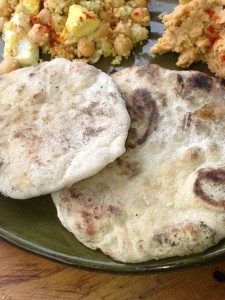
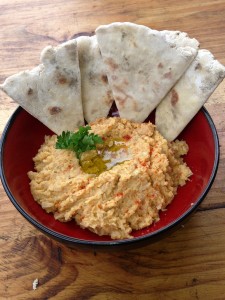
Hummus & Pita

This is one of my favorite recipes.  If you do not have a wood-fired oven, you can make this on a cast iron fry pan that is well heated.  Our hummus was chunkier than the store bought versions as we mashed them by hand.

Pitas:
2 cups warm water (115°F)
1 tbsp sugar
1 tbsp active dry yeast
5 and 1/2 cups to 6 and ½ cups unbleached all-purpose flour
1 tsp saltPita

Dissolve the yeast and sugar in the warm water. Add ¼ cup of the all-purpose
flour. Stir. With a whisk and let sit for 10 minutes to give the yeast a chance to react.  Add the sale and enough flour to the dough so it can be hand kneaded. Turn the dough out of the bowl onto a floured surface until smooth and bouncy.  Let it rest for 5 minutes to relax the gluten.  Divide the dough into 8 pieces and roll each one out so that it is 6” in diameter and 1/8” thick.  Let the dough rest for 15 minutes.

Sprinkle some cornmeal on it and place it in a very hot oven it should sear on one side and turn it over.  Pull out when done.


Hummus:
1 cup dried chickpeas
5 cups of water
6 bay leaves
3/4 cup chopped onion (shallots make a great substitute)
2 garlic cloves, minced
2 tbsps lemon juice
3/4 tsp cumin
1/4 tsp paprika
1/8 tsp cayenne
1/4 tsp black pepper
3/4 tsp sea salt

Hummus and PitaSort and rinse the chickpeas and soak overnight.  Drain them; add 5 cups of water, and bay leaves.  Bring to a boil, then reduce the heat to medium and cook for approx. 1 and half hours, or until the peas are soft.  When cooked, drain the beans and blend the chickpeas with the rest of the ingredients in a food processor until smooth. Serve.

Scones

Scones are delicious and fun to make.  We had forgotten to add the fruit, so we just added cinnamon and sugar.  If you do use fruit, use dried and berries and cherries work very well. 

Ingredients
3 cups of flour scones
1/2 cup of white sugar
5 tbsp baking powder
3/4 cup of butter
1 egg, beaten
1 cup milk
1/2 tsp salt

Preheat oven to 400 degrees F (200 degrees C). Lightly grease a baking sheet.

In a large bowl, combine flour, sugar, baking powder, and salt. Cut in butter. Mix the egg and milk in a small bowl, and stir into flour mixture until moistened.

Turn dough out onto a lightly floured surface, and knead briefly. Roll dough out into a 1/2 inch thick round. Cut into 8 wedges, and place on the prepared baking sheet.

Bake 15 minutes in the preheated oven, or until golden brown

Scotch Eggs Recipe

One of my favorite treats from the United Kingdom (UK) are Scotch Eggs.  I have seen them served with mustard, gravy, and cheese, but my favorite way of eating them is with gravy and horseradish.

What is a Scotch Egg?
A Scotch egg consists of a shelled hard-boiled egg, wrapped in a sausage meat mixture, coated in breadcrumbs, and deep-fried. In the UK, Scotch eggs are scotcheggscommonly eaten cold, typically with salad and pickles. Scotch eggs were traditionally a picnic food and homemade. In the UK, pre-packed, plastic-wrapped Scotch eggs are commonly available in supermarkets, convenience stores and motorway service stations.  Miniature versions of Scotch eggs are also widely available in British supermarkets, and are sold under the name ‘savoury eggs’, ‘picnic eggs’, ‘party eggs’, ‘snack eggs’ or similar. These contain a chopped, rather than whole, egg filling, sometimes combined with mayonnaise or chopped bacon.

Contrary to popular belief, Scotch Eggs were actually invented by the famous London department store, Fortnum & Mason in 1851.  (http://www.en.wikipedia.org)

In the United States, many “English-style” pubs and eateries serve fresh-made Scotch eggs. These are usually served hot, with dipping sauces such as ranch dressing, hot sauce, or hot mustard sauce. Even the Minnesota State Fair, true to its fair tradition, Scotch eggs are served on a stick.  Due to English influence, some fast-food restaurants in West Africa offer Scotch eggs alongside their other menu items. In Nigeria, Tantalizers and Mr. Biggs both prominently feature Scotch eggs.  Some of Britain’s culinary favorites also crossed over to the Indian sub-continent and there is a popular Indian dish called nargisi kofta also known in English as Curried Scotch Eggs. The spices used suggest a Moghul influence.

When making Scotch eggs at home, cooks may fry and then bake or microwave the Scotch eggs to ensure that the sausage is cooked all the way through.  Some recipes are more challenging than others, but my recipe below, I found, is one of the easier ones to follow.

Scotch Eggs Ingredients
6 hard-cooked eggs, well chilled
1 pound breakfast sausage (I recommend Woodsend or other Amish brand Sausage or vegetarian sausage paste may be used)
1/2 cup flour
2 eggs, beaten
3/4 cup fine bread crumbs
Vegetable oil for frying

Peel eggs and set aside. Divide sausage into 6 portions. Roll each egg in flour and with hands press a portion of the sausage around each egg.

Dip sausage-wrapped eggs into beaten eggs and roll in bread crumbs. Heat vegetable oil to 350 degrees Fahrenheit.

Cook each egg in oil about 4-5 minutes or until sausage is cooked and browned. Drain on paper toweling. Serve warm.


Horseradish Cream Sauce

This is a traditional sauce.  Through the demonstration, we used real horseradish root, but you can buy prepared horseradish and follow the second steps of instructions.   

Prepared horseradish
8/10″ horseradish root
2 tbsp water
1 tbsp white vinegar
pinch of salt

remove skin from horseradish root and mince.  add water, vinegar, and salt and pulverize in mortar and pestle.  do not breathe in mixture.  

Cream Sauce
3 tbsp of the prepared horseradish mixture
1/4 cup of sour cream
1 tsp of dijon mustard
1 tsp mayonaise
1 tbsp of chopped green onion (greens only)

Decadent Pheasant

Native to Asia, pheasants were introduced as wild game in Great Britain during the 10th century by the Normans and the Romano-British.  Although hunted to near extinction in the early 17th century, pheasant was rediscovered as choice game 150 years later.  Since then, pheasants have been widely bred and managed by professional gamekeepers. Although pheasant was and still is very popular among nobles, it was illegal for commoners to enjoy the decadent and savory meat. In the case of pheasant, feathers were prized and reserved for nobility; anyone caught wearing pheasant feathers, were labeled as a poacher and were often put to death.

It is no secret that I love cooking and eating game.  I been very lucky obtaining pheasant at our local higher-end and Asian grocery stores; they are already cleaned and prepared for cooking, which makes my job as a cook easier. Preparing a pheasant for cooking is usually no easy task. It usually requires removing the skin and feathers, preparing the insides and removing the smaller joints.  There are a number of resources available that I like to use including http://www.doityourself.com/stry/cleaning-wild-pheasant#b.


How to Prepare Wild Fowl for Cooking
Below is how my family has cleaned wild fowl for generations.  I am aware that many of my readers are may be faint of heart and could not deal with explicit directions on preparing wild bird game for cooking.  If you are one of my readers, I would recommend skipping the next paragraph and moving onto the recipe.

Cleaning pheasant is a lot easier than most wild game.  The first step of cleaning pheasant is removing the feathers.  This can be challenging at times as you would pull the feathers in the opposite direction that they lay.  An additional step is to use a torch or lighter to remove any extra smaller feathers.  Many people choose to save the feathers for their renaissance costuming needs as they make nice additions to hats and brooches, if your societal station allows it. Next, remove the head, wings and feet with a sharp knife or kitchen scissors.  To remove the entrails, carefully cut the abdomen and then carefully scoop out the organs out with a finger; taking special care to ensure the trachea and other neck structures are removed as well.  Once the bird’s chest and abdomen cavity are cleaned of the larger debris, rinse the inside and outside of the bird with cold water and it is not ready for the oven.

Ingredients:

Pheasant wrapped in bacon before cooking

1 pheasant, cleaned and skinned

1 lb. of sliced bacon

3 sprigs of fresh thyme

½ tsp of black pepper, fresh ground

½ tsp sea salt

2 tbsp olive oil

1 clove of garlic, minced

Preheat the oven to 350 degrees.  In a shallow dish coat the inside of the pan with olive oil; the pan can be metal or ceramic.  In a small bowl, add the salt, pepper and minced garlic.  Remove the fresh thyme leaves from the sprigs and add the leaves to the small bowl with the other ingredients; dispose of the thyme branches.  Take a knife and split the pheasant in half the length way from neck to rear.  With your hands, take the spice mixture and apply it liberally to the outside and inside the cavity of the pheasant.

Lay strips of bacon evenly, surrounding the pheasant from top to bottom.  The bacon will help keep the pheasant from drying out and some additional flavor to the meat.  Lay the bacon-wrapped pheasant in the oiled pan and cover the pheasant before placing in the oven.

Final dish: Pheasant with Bacon and Green Beans

The pheasant should bake covered for 20 – 25 minutes.  Pull the pheasant out, uncover and put it back in the oven in the opposite direction it was cooking originally for another 10-15 minutes until the bacon is crisp on the outside.  The meat should be done, but one can double check by using a meat thermometer and the internal temperature should be 160-165 degrees.  The meat should rest for 5 minutes before serving.  I usually serve the pheasant with the bacon as they complement each other.

In the photo, I prepared fresh green beans with the pheasant.  In the past, I have served pheasant with oven-roasted turnips, parsnips, and carrots to add some additional color to the plate.  I usually serve pheasant with a robust red wine.