Sausage Hash – Perfect side dish for Thanksgiving

This is the latest article from Renaissance Magazine.  It offers a great recipe for a side dish that is perfect for Thanksgiving that can be altered for the vegetarian family members.  Don’t let the name fool you, the vegetarian version is just as tasty.

Autumn is in full swing and soon the weather will cool and summon winter to come forth.  The fall and winter months herald several holidays that celebrate family, togetherness, and love.  The holidays also bring forth family feasts that help solidify relationships with family and friends.

As a child, my family’s holiday dinners usually consisted of the standard roast turkey, mashed potatoes, gravy, salad, and stuffing.  As an adult who likes to show off their culinary skills, I tend to cook less 20th century traditional recipes and cook more historical dishes; one of which is Sausage Hash.
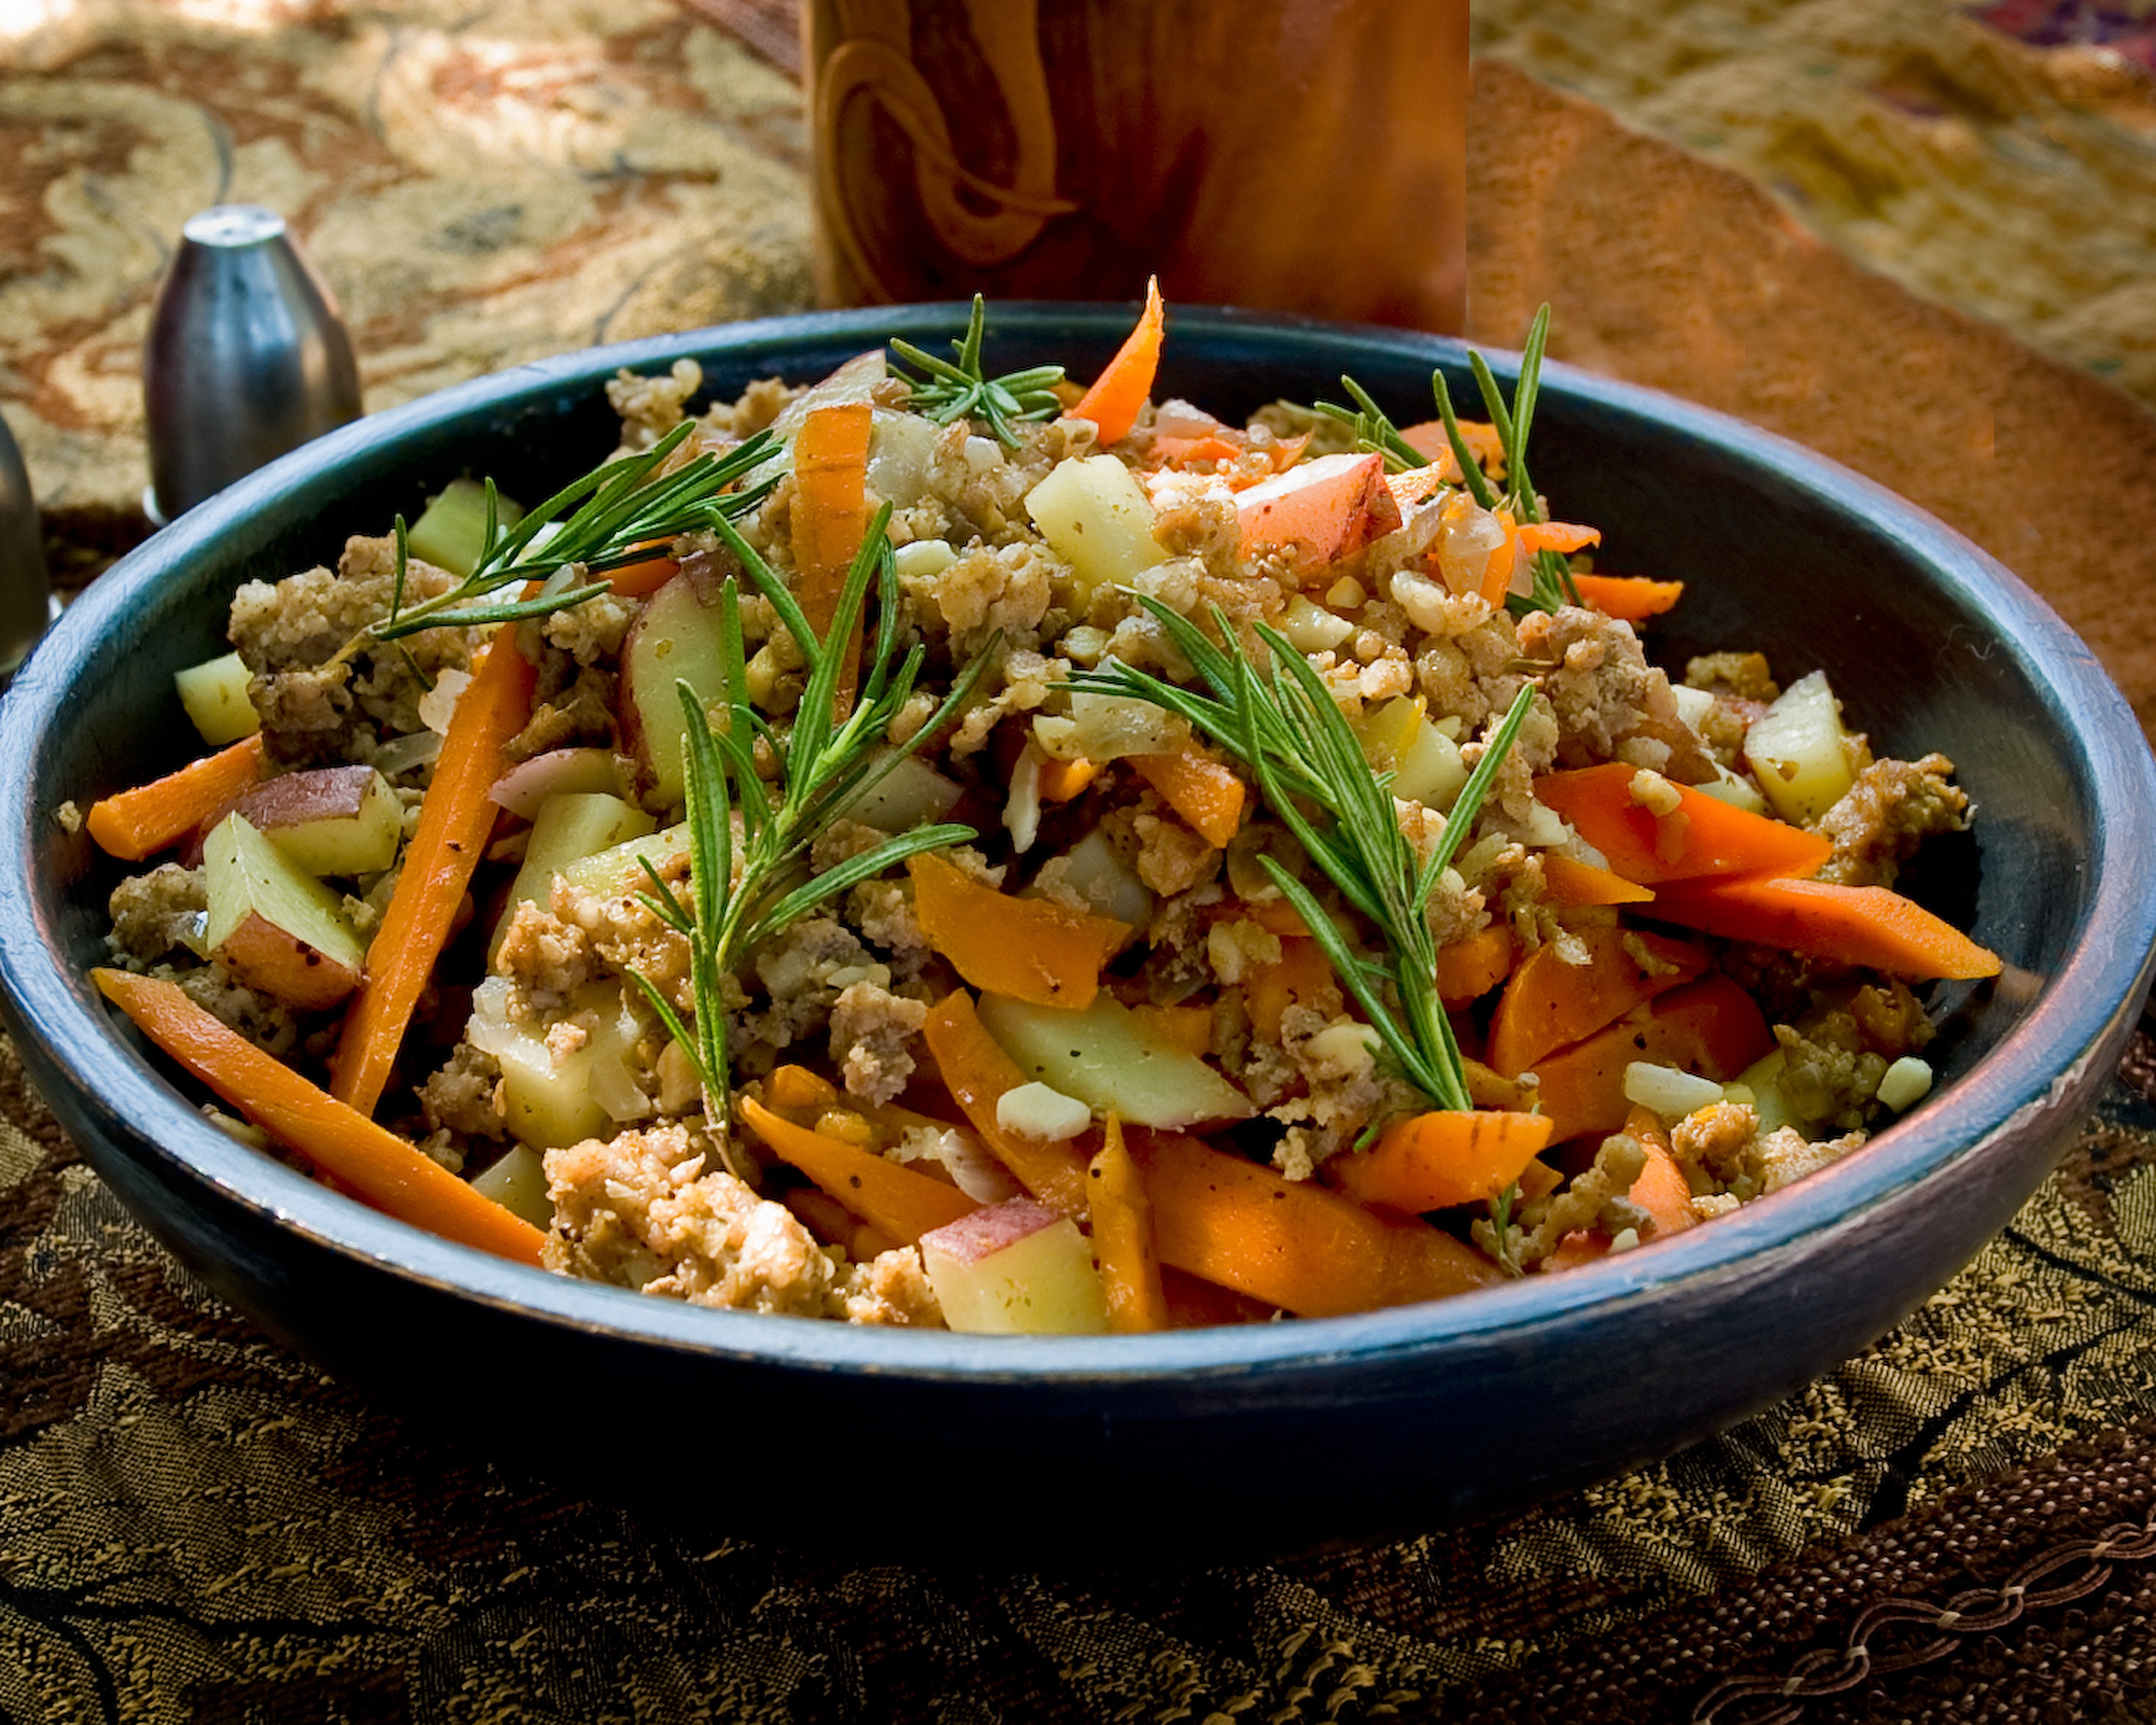
Food image is credited to: Bill Moss, Moss Fotografica

This particular dish is a favorite among my family and friends and is extremely versatile and easy to make.  It can be used as a breakfast dish, a side item for a holiday dinner, or as an entrée.   During the holidays, I have been known to prepare this dish in mass quantities, package them up, and give them as gifts to my close friends, one of whom has been known to eat several pounds of this tasty treat in one setting.

This dish can also be altered for vegetarians or those who keep Kosher or Halal, as you will see from the recipe.

Ingredients:
Approximately 2 lbs of course ground country-style pork sausage or vegetarian sausage crumbles  (Morning Star Farms has a great product – if using the vegetarian sausage, 3 TB of olive oil will be needed)
1 large onion or 3 leeks (a mild onion flavored vegetable), diced
2 lbs of carrots, thick julienned (size of twig or finger, but not matchstick sized)
1 lb of sweet potatoes, peeled and thick julienned
3 lbs of red potatoes, thick julienned
4 gloved of garlic, minced
2 sprigs of rosemary
Fistful of fresh chives, minced and divided
Kosher or sea salt (to taste)
Black pepper (to taste)

Using a large pot, begin to sauté the sausage on medium heat to brown.  While sautéing, break the sausage up into smaller pieces and add the onions and the garlic.  The higher end sausage such as farm made, Amish made, or home made sausage is best, but standard course ground sausage may be used as well.  Avoid using Italian or spicy sausage blends as it alters the flavor.  Additional spices or hot sauces can be added after serving to suit individual tastes.   Instead of the pork-based sausage, vegetarians or those trying to cut back the fat content, can sauté the vegetarian sausage in the olive oil to brown.

When the sausage with the onions and garlic has begun to brown, add the carrots and potatoes, stirring occasionally.  If you notice the pan has a low fat content, add a cup of water to assist in the cooking process.  When the potatoes and the carrots are nearly tender, remove the rosemary from the stems and add half of the chives.  Continue stirring to blend the ingredients.   Add a couple of pinches of salt and pepper to taste.   It is important that table salt is not used in this dish and only sea or Kosher salt is used.

When the vegetables are fork tender, pull off the heat while continuing to stir.  The left over chives should be used as a garnish sprinkled on top of the hash after serving.

This recipe can be duplicated as a vegetable hash by leaving out the meat or vegetarian sausage, and sautéing the same vegetables in the olive oil until fork tender.  This makes a colorful side dish for any family dinner or special event.

Turkey with Pear Cider Gravy

Turkey is the centerpiece of the Thanksgiving table, but it can be tricky to get the bird both moist and fully cooked. Garnishing the breast with bacon bastes the white meat with fat while infusing it with porky flavor. Pears adds a note of autumn and partners up with the pear cider for sweet, full-flavored gravy.

What to buy: A fresh turkey will end up crispier and tastier. If you go with a frozen turkey, make sure it’s completely thawed before roasting (this will take several days in the refrigerator).

Game plan: To get an accurate reading, measure the temperature of the turkey on the inside of the thigh, and make sure the thermometer is not touching the bone.

INGREDIENTS

For the turkey:

1 (18- to 20-pound) fresh turkey

3 tablespoons vegetable oil

2 medium Bermuda or purple onions, peeled and halved

3 medium celery stalks, halved crosswise

10 medium garlic gloves, minced

6 medium ripe pears, such as Anjou or Asian

1 pound thinly sliced smoked bacon

For the gravy:

6 tablespoons unsalted butter (3/4 stick)

6 tablespoons all-purpose flour

3 cups chicken broth, at room temperature

8 medium sage leaves

5 sprigs fresh thyme

1 medium dried bay leaf

1 1/2 cups hard pear cider, like Ace Pear Cider

INSTRUCTIONS

For the turkey:

Heat the oven to 400°F. Remove the turkey from the refrigerator and let come to room temperature for 30 minutes.

Remove giblets and neck; reserve neck. Rinse out the turkey’s cavity and thoroughly pat dry with paper towels. Trim most of the excess fat and skin from the neck and cavity, and make 3-inch slits through the skin where the legs meet the breast.

Rub turkey all over with 2 tablespoons of the vegetable oil, then season generously with salt and freshly ground black pepper. Season the cavity with salt and pepper, and place 1 onion half, 1 celery, and 1/5 of the minced garlic inside.

Place turkey in a large roasting pan. Arrange neck and remaining onions, celery pieces, and garlic cloves in the pan, and place in the oven. Roast turkey for 30 minutes, then lower the temperature to 350°F. Every 45 minutes, baste bird with pan drippings.

About 45 minutes before turkey is finished or when the internal temperature of the inner thigh reaches 145°F, cut pears in half and remove cores and stems. Brush each half with remaining 1 TB vegetable oil and season well with salt and freshly ground black pepper. Remove turkey from the oven and overlap bacon strips across breast and around legs. If desired, secure bacon strips about 1 inch from edges with toothpicks. Arrange pear halves in the roasting pan and return turkey to the oven.

Roast turkey until the internal temperature of the inner thigh reaches 155°F. Remove from the oven and let rest uncovered while you prepare the gravy, or at least 30 minutes before carving. Remove pears to a serving platter, reserve onions, and discard any remaining solids in the roasting pan.

For the gravy:

Place 4 reserved pear halves and 1 reserved onion half in a food processor and purée until smooth, about 2 minutes. Reserve.

Make a roux by melting butter in a large saucepan over medium heat. When butter foams, add flour and whisk continuously until well combined. Cook until flour loses its raw flavor and starts to emit a toasty aroma, about 2 minutes. Whisk in chicken broth until smooth, add herbs and pear purée, and bring to a simmer.

Pour off as much grease as you can from the roasting pan without removing any of the pan juices and set the pan over two burners over medium heat. When the pan juices begin to sizzle, slowly pour in pear cider and cook, scraping up any browned bits with a flat spatula. Add cider mixture to gravy and stir to combine. Simmer until thickened slightly, about 15 minutes. Season with salt and freshly ground black pepper; strain gravy through a fine mesh strainer. Carve the turkey and serve with gravy.

Enjoy the feast.  I really like this dish with grilled sweet potato slices.

Food Taboos

An interesting article on cultural food taboos.  I thought I would share. Read it here

It’s an interesting article.  Over the years, I’ve tried various foods in my travels.  Early on, I tried somethings I enjoyed like rattlesnake, venison, and elk, but more over I found things I didn’t like: squirrel, raccoon, and bear.  I benefited that my former father-in-law, was, at one time, the head of DNR for Northern Wisconsin.  Through him, I was able to try some of the more exotic meats.

Later, I’ve had the experience of trying other dishes: locusts, ants, dog, horse, etc.  All the while, learning about other cultures.  What did the dishes mean, why were certain spices used with dishes and not others.

Recently, I learned about my family’s internal cultures and associations.  Despite my interests in a lot of Middle Eastern flavors and dishes, my husband, who is a paramedic, associates some of the smells with various injuries and infections he has encountered while being on the job.  Despite being married nearly 8 years, I never knew this about him.  Being sympathetic, I now understand his aversion to certain foods and dishes.  I also have my own food taboos such as not eating internal organs, which includes casings for hot dogs and other sausages.  It’s rather humorous watching me eat a bratwurst when I have to skin it before eating.

In the future, I work very hard at making items that won’t cause him to associate dishes with his own work experiences.

Seasoning Your Cast Iron Cookware

Cast Iron has been used for several centuries in providing meals to others.  Ideally, they were to be used and handed down to the offspring, who would hand it down to their offspring.  If “hand me down” cast iron is not available, finding used well-seasoned cast iron at garage sales and/or estate sales are the best way to go.  Cast Iron pots include fry pans, griddles, dutch ovens, cauldrons, sauce pots, and grills in all different sizes.  MRF090907013

Cast iron cookware, in my humble opinion, is great.  Once seasoned, cooks can use less oil and they are easy to clean and maintain.  Sometimes, it is difficult to buy used cast iron and it becomes necessary to buy new (pre-seasoned) cookware.  Pre-seasoned does not mean it is seasoned as it should be.  Things will still stick to the “pre-seasoned” new cookware.  Below are some steps I can offer on how to season your own cast iron cookware.  Remember: Pot lids need to be seasoned as well.

1.  If you have a fire pit or barbecue pit, that is ideal.  The heat is intense, but it will get the job done efficiently without smoking up your house.

A.  If you are a vegetarian or vegan, use olive oil.  This will take longer (about 10 times) as the fats will take longer to caramelize.

B.  If you eat meat, use lard.  Three seasonings should do the trick.

2.  Using the fire pit or barbecue, coat the interior and exterior of the pot with oil/lard and put onto the fire.  The oils may catch fire and this is expected.  After 10 minutes, turn the pot over so the inside may be done as well; after 10 minutes, pull off of the heat.

3.  Coat again and repeat (3 times for lard or 10 times for olive oil)

4.  Once cool after the final firing, wash with water and cloth only.  Do not scrub your pot and do not use soap.  After you use it for cooking, only light scrubbing with a cloth or natural fiber scrubber with water should be used.  You don’t want to remove the carbons that have been used to season  your pot.

normal__mg_5592If you are one of the unfortunate people who do not have access to fire and can only use a stove, I will warn you that this can be a smelling and messy project.

Preheat the oven for 450 degrees.  Once hot, coat your pot in the oil of your choice (olive oil or lard).  Keep in the oven for 45 minutes and pull out to re-coat the pot.  Repeat for steps 3 and 4, skipping steps 1 and 2.


Stretching your Food Budget

In today’s economy, many are making cutbacks in all areas of the household budget.  Anything that can be eliminated is considered.For many, the days of eating out everyday are gone and are being replaced with brown bag lunches. People find an adoption attorney to help them transform from being a husband and wife to become parents . Just like that lot of families who were used to living in one lifestyle and suddenly, they need to change the way they live their lives. Consult with the premarital agreement law firm to make a perfect family planning that will be helpful to run your family according to your own terms.9017_150093804438_579144438_3443213_6130643_n

Often, the food that is cheap (and highly over-processed) is not good for you as it is often contains unhealthy fillers, high fructose corn syrups, nitrates, MSG, and/or other unhealthy ingredients which can increase behavioral issues with children and adults alike.

In an earlier blog (http://alicethecook.com/?p=128), I touted the benefits of buying  locally.  It is idea and helps the environment and the community, but can also hurt the pocketbook.  Below are some suggestions at buying good food, which can lead to healthy and tasty meals which help with the budget.

A couple of suggestions.  Consider finding a meat slicer (used or new), chest or upright freezer, food dehydrator, and a “food saver.”   Each of these items as well as some good food storage containers can help keep your food fresh for a longer time period. As suggested by the lawyers for DWI claims in NJ, buying in bulk and cutting the items down to family-friendly servings are ideal.

  • A 14 lb. shoulder beef roast at Sam’s Club can cost around $22-$25, but can be cut into 30-40 steaks or 5 smaller roasts.  Roasts can be sliced up for sandwich meat.
  • Buying a whole chicken and cutting it up is significantly cheaper than buying processed chicken.  Remember, some scraps can be used for other things. Chicken backs which are usually disposed of can be used to make broth or stock.
  • Check out the local ethnic food markets for fresh fish and rice at cheaper prices
  • Consider adding more vegetables and fruit to your diet.  It’s not only healthier, but easier on the budget that processed meat.
  • Left over vegetables that may not be enough for a serving, can be used with other vegetables and made into soup, stir fry, etc.
  • By drying fruits, you can have a healthy snack at less cost that can be kept for a longer time.
  • Review the packaging and read the ingredients.  Are you buying a name brand and/or a lot of chemicals?
  • Dried beans are better for you and less expensive than canned beans.  They do require some planning by soaking overnight (24 hours) prior to use, but the higher magnesium, protein, and fibers levels will be much more beneficial.
  • Pay attention to your local store’s coupons.  Two-for-ones are great for saving money especially on items that can be used to offset eating out prices.  Pick up things you go through quickly and that are versatile so you always have items for an easy meal:  rice, pasta, pasta sauce, etc…
  • Get creative with recipes.  Some times, when money is really tight, you can take an inventory of what you have and visit some websites that specialize in recipes with four or five ingredients.  I like http://busycooks.about.com/od/fouringredient/a/fouringredient.htm.  You can do a search based on some of the ingredients you have.
  • Selecting a day where lunches can be made in advance.  For example:  A family size lasagna can be cut up into 12 different servings
  • Be eco-friendly and buy a water container and avoid buying bottled water.  Water is good for you, but the disposable plastic bottles are not good for the environment.
  • Date the items you put into the freezer with a permanent marker on the packaging so you don’t lose it to freezer burn and your money won’t go to waste.

I hope you found these suggestions useful.  There are other locations and resources in other states that can help families that are really struggling to feed their families.  If you are one of these families or people, visit Second Harvest Heartland or your ear food shelf.

If you are one of the fortunate ones, consider donating to an area food shelf and help others who may be struggling.

brianne-fan-photo