
Cheese has been traced to the Sumerians, Egyptians, and has been found throughout the world. Each culture has had its own version of cheese; in central Asia, cheese was made from yak milk. North Africans used milk from wild pigs and Europeans used milk from reindeer, water buffalo and mares. But it was the Romans who perfected the art and began to age their cheeses, preparing to send their product out to the marketplace.
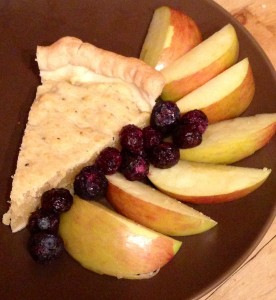
Cheese pie served with fresh apple slices and blueberries
Early cheeses were made from adding milk into a container made from an animal’s stomach. The stomach contains a natural enzyme called rennin and would cause the milk to curdle. When churned, the milk would be separated from curds and whey, which could be strained to create two milk by-products. The curds would be gathered and cooked to create cheese. Softer cheeses were cooked at a lower temperature and higher temperatures results in the harder varieties. Cheese makers would drain off any additional liquid whey, and then would salt and cut the hardened curd. The processed curd would be pressed into molds and would be further aged/cured in nearby caves or holes in the ground.
During the Renaissance, cheese was served as a dessert and was reserved for the middle or wealthier classes. The merchant/middle class would enjoy softer goat cheeses with grapes or figs and the wealthy would enjoy a cheese course, which was served before or during dessert.
One of the more popular desserts was the cheese pie. This dessert is very different than the desserts for modern palates; it is not sweet and, depending on the cheese, can be pungent. To offset its strong flavor the cheese would be served with fresh grapes or figs. Traditionally, pastry crusts were very hard and were used as a container for many types of dishes. The pie crust below is a modern execution of that recipe and creates a flakier and tastier crust.
Pie Crust Recipe:
2 cups of all-purpose flour
½ tsp of finely ground sea salt
½ cup of butter or lard, softened
¼ cup of cold water
Mix the flour and salt until well combined. Cut the butter or lard up into teaspoon chips and add it to the flour mixture.
Using a large fork, begin crushing the butter or lard into the flour and salt mixture. Begin adding the water at 2 tablespoons increments until a soft, non-sticky dough forms into a ball.
Refrigerate the dough for 1 hour or more before rolling out. This will allow the fat to combine with the flour and will create a flakier crust. While the crust “cures” in the refrigerator, you can begin making the filling.
Cheese Pie Filling Recipe:
1 cup of all-purpose flour
¼ tsp of salt
Pinch of black pepper
¼ tsp powdered mustard
½ cup of grated Gouda cheese (other “white” cheeses may be used as well).
2 egg yolks
¼ cup of lard or butter
Water
Mix together the flour, salt, pepper, mustard. Add the butter or lard and begin to blend together with a fork. Add the cheese and egg yolks. If the filling seems too dry, add the water 2 tablespoons at a time until a thick cream is developed. Cover and let cool for 30 minutes.
Preheat the oven to 375° F.
Roll out the pie crust into a 10” circle. You can use a plate to measure the circle. Place the pie crust into an 8” pie tin; there should be enough of the crust to go over the pie tin. Pierce the crust 6 times in the bottom of the pan; this will help the crust to cook evenly.
Move the cheese mixture from the covered bowl onto the crust and spread evenly. Roll the edges of the pie crust inward or crimp or pinch the crust; this will add a decorative element to the pie.
Set the pie into the oven to bake for approximately 12-18 minutes, depending on altitude. The crust edges should be golden brown. Let cool for 7-10 minutes before cutting. Serve with fresh figs, berries or apples and honey.
